Showing posts with label cakes by jen. Show all posts

Friday, October 28, 2011

My Little Pony Cake

Right now pretty much everything makes me want to vomit, (why I'll go ahead and let you guess), sadly this includes cake and frosting.  But when a friend asked me to make her step-daughter's My Little Pony Cake I couldn't resist.  It turned out so cute, I'm glad I did it, even if I couldn't quite look at it until it was covered in fondant. 

Happy Birthday Adalynn!

Saturday, September 10, 2011

A Scuba Diving Cat!

My friend's daughter is turning 7 and when her Mom asked her what kind of party she wanted she said 'a scuba diving cat party'.  So here ya go a scuba diving cat cake...


The bottom cake is a chocolate cake with peanutbutter & chocolate ganache and a butterfinger buttercream.  The top is a something a bit lighter; hot milk cake with a raspberry meringue buttercream

Monday, August 22, 2011

Hot Milk Cake Lemon Buttercream


This was my first attempt at a Hot Milk Cake.  It tastes a bit like angel food cake.  Very light, fluffy and sweet.  I frosted it with a lemon buttercream.  To make this I added 3 tablespoons of home made lemon curd to every one cup of vanilla buttercream.

The hot milk cake recipe I got from my newest favorite book: Miette

This cake is for my boyfriend's mom's birthday.  Happy Birthday Donna!

Tuesday, August 16, 2011

S'more Pie please!

I found a recipe on http://www.justataste.com/2011/07/smore-pie/ for a smore pie that looked so good I had to make it.  I have to admit the first attempt did not turn out so great.  While the chocolate part was fantastic, the marshmallow part was a bit...hate to use this word on a food blog but, snotty.  Eeeew, I know.  I didn't give up hope.  I had made marshmallows before, so I used that recipe to make the top part.  Here is my adapted recipe.  It is rich, creamy, fluffy, sweet, ooey, gooey and just summer-lovin good!  It'll have every body asking for S'more Pie please!  (I know, I'm a bit of a nerd, I can't help it)

S'More Pie


Ingredients:

Chocolate filling
1 nine inch pre made graham cracker crust, or make your own
1 cup bittersweet chocolate, (not more then 70% cacao) I don't have the greatest selection here, but I often use Ghiradelli's dark chocolate 60% cacao chips
1 cup heavy cream
1 large egg, room temp
Marshmallow:


  • 1 1/2 packages unflavored gelatin


  • 1/2 cup ice cold water, divided


  •  3/4 cup sugar


  • 1/2 cup light corn syrup


  • 1/8 teaspoon kosher salt


  • 1/2 teaspoon vanilla paste


  • I scaled this recipe down as much as I could, you will still have some left over, store in an air tight container at room temp.  Ooh, I see some rice krispy treats in my son's future.

    Directions:

    Unwrap the pie shell and place it on a cookie sheet.

    Preheat the oven to 350ºF.

    First make the chocolate filling by placing the chopped chocolate in a large bowl.

    Bring the heavy cream to a boil in a heavy saucepan then pour it over the chopped chocolate and let it sit for 1 minute.

    Whisk together the chocolate and heavy cream until it's thoroughly incorporated and smooth.

    Gently whisk in the egg and a pinch of salt until combined then pour the mixture into the prepared pie crust (it will be about half full).

    Cover the exposed crust with a pie shield or foil.

    Bake the pie for 20 to 25 minutes, just until the chocolate is mostly set but slightly jiggly in the center.

    Allow the pie to cool on a rack for one hour while you make the marshmallow topping.

                                                         MARSHMALLOW TOPPING:

    Place the gelatin into the bowl of a stand mixer along with 1/4 cup of the water. Have the whisk attachment standing by.

    In a small saucepann combine the remaining 1/4 cup water, granulated sugar, corn syrup and salt.

    Place over medium high heat, cover and allow to cook for 3 to 4 minutes.

    Uncover, clip a candy thermometer onto the side of the pan and continue to cook until the mixture reaches 240 degrees F.

    Once the mixture reaches this temperature, immediately remove from the heat.

    Turn the mixer on low speed and, while running, slowly pour the sugar syrup down the side of the bowl into the gelatin mixture.

    Once you have added all of the syrup, increase the speed to high.

    Continue to whip until the mixture becomes very thick and is lukewarm.

    Add the vanilla during the last minute of whipping.

    Immediately pour the marshmallow topping over the pie. It will be loose enough to spread.

    Refrigerate the pie for one hour, uncovered, then cover it with plastic wrap that has been coated lightly in vegetable oil and chill it for 3 more hours.


    Preheat the broiler.

    Place the pie on a cookie sheet, remove the plastic wrap and cover the pie edges with a pie shield or foil.

    Very carefully rotate the pie under the burner, about 3 to 4 inches away from the flame, just until the top is evenly browned, about 3 minutes.

    Let the pie cool for 10 minutes before slicing it with a sharp knife dipped in hot water.


    Friday, August 12, 2011

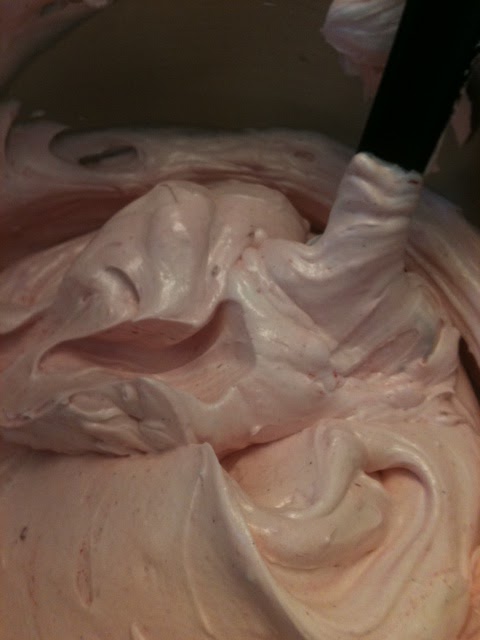
    Italian Buttercream

    I am in LOVE with this buttercream.  I have been hesitant to try European buttercream because it seemed so technical and I'm more of a figure-it-out-as-you-go kind a gal, but holy crap it is so worth the trouble.  And really after I've made it a few times I'm sure it won't even feel like a big deal to make.  It is so far superior to any American buttercream you will never look back.
    It tastes like cross between whip cream and what we know as buttercream.  It is silky and smooth and light like whip cream, but tastes rich and creamy like a buttercream.
    Here is what you need:
    2 cups sugar
    1/3 cup water
    5 large egg whites (Room temp eggs)
    1 tea cream of tartar
    3 cups unsalted butter- (soft)
    1 tablespoon vanilla paste (or 2 tablespoon vanilla extract)
    Candy thermometer

    Okay, this may sound complicated but really, it's not so bad, and totally worth it.  Here's a very key tip: Make sure all your ingredients are ROOM TEMPERATURE. 

    1. Small pan over med heat, combine sugar & water.  Clip candy thermometer to side.  Cook mixture until reads 248 degrees. About 5-10 min.  Keep your eye on it!

    2.  Meanwhile combine egg whites (room temp) and cream of tartar in bowl of standing mixer with whisk attachment.  When sugar mixture reaches 240 degrees start whisking egg mixture at med-low speed.

    3. When mixture reaches 248 degrees, reduce speed to low and very slowly pour mixture into the bowl.  Try not to splatter the very hot sugar.  Once all the sugar has been added turn the mixer to high and beat until cool to the touch (not cold-cool, just barely warm if that makes sense).  An instant read thermometer would read 65-70 degrees.  This should take about 5-10 minutes (or even up to 15 min). 

    4. Once meringue cool enough (very important, if not cool enough, it will separate), begin adding butter.  Reduce speed to medium and while mixer running add butter 1 tbl at a time.  Make sure it is completely mixed in before adding more.  The mixture may deflate and begin to look curdled.  Raise the speed to high and continue adding tablespoon sized butter, making sure each one is blended in before adding more. Once all the butter is added the frosting should be smooth and thick.  Add the vanilla and mix to combine.

    5. Use it immediately, or cover and refrigerate until needed.  Store in zip lock bag for one week in fridge and up to one month in freezer.  (To thaw, leave in fridge over night, not counter).  To use frosting that has been chilled, remove from fridge and bring to room temp, about one hour or microwave in 15 second intervals, mixing in between each until soft. 

    The pic I took is of a raspberry buttercream. After making the frosting add 3 tablespoons raspberry juice to every 1 cup frosting.  It gives it a very pretty pink color with just a touch of berry flavor.

    Raspberry Juice
    2 cups raspberries
    2 tbl water
    1 tbl sugar
    Cook over med-low heat 10-15 min, until berries liquefied
    strain
    Cool to room temp before adding to buttercream


    Monday, August 1, 2011

    Doughnut Pops

    Doughnuts are cute.  Doughnuts on a Popsicle stick are even cuter.  If I had some little bags and bows for packaging they would be so cute, I probably wouldn't be able to handle it!


    HOME MADE (SEMI) DOUGHNUTS:

    One can buttermilk biscuits
    lots of vegetables oil or shortening
    Cut biscuits to desired size, cut whole out of middle, slightly larger then you want.  The middle hole will fill in and get smaller when you cook them
    Heat oil in pan, it doesn't have to be enough to cover biscuit, you can flip them over.
    Test oil with small piece of dough, oil should bubble around.
    Cook each side for about 15 seconds or when get golden brown.
    Cool, frost, sprinkle, wha la! 


    Monday, July 25, 2011

    I'm Ridiculous

    I was thinking I would like to get some cards made up, not that I'm looking to start up a new business or anything just yet, but it would be nice to have something handy with all  my info (phone #, email, blog address, etc) on. Which lead me to thinking; well, I'll need  a cute logo made up with my name on it, which got me thinking, (yup here's the ridiculous part); maybe I should change my blog name (AGAIN!)  Was thinking 'Sweet Treats' (is that redundant? Is there any other kind of sweet?)  Or maybe 'Sweet Designs' 'Sweets By Jen' Can you tell I'm partial to the word 'sweet'? 

    Saturday, July 23, 2011

    Race For The Cure Donation Cake

    This cake was made for a silent auction to help raise money for Race For The Cure.  The guide lines were elegant and decadent.  I made a 6" chocolate cake with alternating layers of vanilla and rootbeer buttercream.  The idea was a rootbeer float cake. 


     The stand is also part of the auction.  I was admiring a friends cake stand (she's very crafty too) one day and she told me she had made it.  The idea is so simple I almost feel dumb for never thinking of it.  This cake stand cost me about $1 to make.  It is a plate and vase found at a thrift store glued together.  Brilliant!

    Friday, July 22, 2011

    Sweet Little Cake

    I think I may be on a cherry kick.  But I needed a simple, pretty little cake I could make to take up to my in laws for dinner.  My Mom used to make this cake when I was growing up and I always thought it was so pretty.
    This is a  6" vanilla cake with cream cheese frosting and topped with cherry pie filing.  So simple and so pretty. 

    Monday, July 4, 2011

    As American As Cherry Pie!

    I couldn't let a holiday go by with out baking something, but I was short on time and hadn't found anything new or exciting to inspire me, then I remembered Cherry Pie Cupcakes.  I had always wanted to make these they are so cute and incredibly simple. 

    I used a box mix of yellow cake to save time (replacing the water with buttermilk to make a moister cake), I made a cream cheese buttercream:
    1 box cream cheese
    1 stick of butter
    1-2 tea lemon
    1 tea heavy cream
    1 tea vanilla bean paste
    1-2 cups powdered sugar
    All measurements are approximate.  When I make my buttercream I start by:
    Creaming my butter &/or cream cheese. 
    When that has become smooth I add my liquid; cream/coffee/liqueur/lemon juice, etc
    Then I add powdered sugar, about 1/4 cup at a time so not to over sweeten.
    Stop, scrape down sides, taste test.  Add more sugar/liquid/butter/cream cheese as needed. 
    Blend, stop, scrape, taste as many times a needed until it is right.

    For the cherry pie topping, I just used a can of cherry pie filling, so simple!

    I cut the tops of the cupcake off so that the cherry pie filling would not fall down the sides.
    Put thin layer of frosting on top of cupcake
    Piped standerd boarder to hold in filling and give 'crust' apperence
    Topped with cherry pie filling
    Piped a basket weave on every other one

    The result; the cutest cherry pie cupcakes that tasted like a cherry creamcheese cake, yumm!

    I was trying to finish these quickly so that I could play bubbles outside with my son, so I only made 4.  With the leftover frosting, I quickly smeared it on the rest of the cupcakes.  I'm usually a fan of the piped frosting on cupcakes, but there's something to so yummy looking about a messy cupcake don't ya think?


    Happy Fourth Everyone!

    Wednesday, June 15, 2011

    Happy Father's Day!

    Guys don't generally like sweets or flowers, but you know what they do like...bacon!  So here's a flower I'm pretty sure any man would like to get for Father's Day.


    Yup, bacon roses!

    They smell great, taste great, and are pretty much the coolest thing ever!

    Happy Father's Day to the best Dads I know!  Love you!

    Here's how ya do it:
    You need:

    Package of bacon, I found the longest looking strips I could
    Mini muffin pan, if you can find a disposable foil one I HIGHLY recommend getting it (easier for clean up and set up)
    Fake roses
    Pull off fake roses from stem
    Drill hole in bottom of each cup (here's where the easier set up comes in with the disposable ones, you can just poke a hole with anything sharp and don't need to get out the power tools)

    Wrap bacon around each cup, starting on the outside/widest part of the cup.  Use the cup as a mold, and just swirl the bacon around till you get to the middle.  Sorry if that's confusing.  When I found this idea online, ya that's right, sadly I did not come up with this awesome idea on my own, but the site that I found instructables.com said to roll the bacon up and place in muffin tin.  These turned out too tight almost like rose buds.  I found that if they where rolled looser and the edges almost folded out, they looked like real roses, so I used the muffin tin cup as a mold. 
    I put my muffin tin over a cooling rack and put the cooling rack on a cookie sheet (lined with foil for easy clean up), that way the grease that dripped out the bottom would drain onto the cookie sheet and the bacon roses could drain and not just sit in the oil.  I would occasionally pick up the roses to help the draining process.
     Bake in oven until your house fills with smoke and can take it no longer (about 45 minutes)
    I think a deep frier would come in very handy for this project, if you ever feel the need to mass produce.
    Once cooled just stick on rose stems that you have taken fake roses off. 

    Sunday, January 2, 2011

    TV Dinner tray cupcakes!

    I've really got to get better about this timing thing.  So, it's a little late for Thanksgiving treats, but maybe keep in mind for next year, or there so dang cute you could just make them anyways.

    TV Dinner cupcake tray! 
    Saw this in 'Hello Cupcake!' and had to make it.  Took a ton of candy, but was fun to make and it looked so real!  The mashed potatoes and gravy are definitely my favorite.  Here's what you'll need if you want to make, and remember you can always substitute if you don't have something, I always have to supplies are a tough find in Alaska.  Just get creative!

    Chicken leg:
    doughnut hole (I used macaroons and cut bottoms off)
    corn flake crumbs
    white chocolate; melt, put in piping bag (or sandwich baggie, cut end off) draw shape of bone with pointy end on wax or parchment paper.  Let dry, wha la a bone!

    Peas and Carrots:
    skittles and starburst
    (or runts and laffy taffy, or anything else you can think of)
    green frosting

    Mashed Potatoes and Gravy:
    white frosting
    Carmel sauce
    laffy taffy or starburst

    Pudding:
    chocolate frosting
    sprinkles